
The Final exam will be based on lecture material and readings covered in the second half of the term. It is NOT cumulative (on the whole term). It will be based on:
 So if your sample is 20/70/10
So, start with sand. In this example, the % sand is 20. So, go along the bottom from right to left to 20. Your sample will be along that 20 “line” somewhere.
Next go to silt — 70%. Silt is along the right hand side. Go down from the top to 70. When you find 70 on the silt axis (edge), your sample will be along that line.
Last, go to clay — 10%. Clay is along the left side. Go to 10. Clay is the easiest because the white lines go horizontally, so you go across on the 10 line.
And you’re there! A beautiful SILT LOAM!
It is a bit confusing! The key is to remember it’s always SAND-SILT-CLAY! And to make sure you are using the correct side. I will give you the identical diagram as above in the exam (I’ll just cut and paste it).
Hope that helps. B
So if your sample is 20/70/10
So, start with sand. In this example, the % sand is 20. So, go along the bottom from right to left to 20. Your sample will be along that 20 “line” somewhere.
Next go to silt — 70%. Silt is along the right hand side. Go down from the top to 70. When you find 70 on the silt axis (edge), your sample will be along that line.
Last, go to clay — 10%. Clay is along the left side. Go to 10. Clay is the easiest because the white lines go horizontally, so you go across on the 10 line.
And you’re there! A beautiful SILT LOAM!
It is a bit confusing! The key is to remember it’s always SAND-SILT-CLAY! And to make sure you are using the correct side. I will give you the identical diagram as above in the exam (I’ll just cut and paste it).
Hope that helps. B
- Labs 4-6 (mostly 4-5, which you should have back, plus Lab 6 … know how to do it, it’s not too hard — see the extra note at the bottom of this page)
- Chapters 16-18 of Geosystems and online notes covering those chapters, also the online notes on Eolian and Desert Landforms and Theological Issues
Format
The exam will follow a similar format to the midterm: 40-50 multiple choice questions (based mostly on my notes); 4-5 “short answers” (a few sentences and/or a simple diagram to define a concept); 4 or 5 diagrams or lab-based questions. For example … a multiple choice question might be: A glacier is … a. another word for glossolalia (a.k.a. speaking in tongues), b. a large accumulation of ice, on land or floating as an ice shelf attached to land. c. a hockey player who is an exceptionally speedy skater, d. the favourite food of the Loch Ness Monster. Hopefully you’ll pick “b”! A short answer question might be: Define and distinguish between a sea stack fault and a sea cave. A simple diagram with a brief, one or two sentence description would be sufficient. I will give you some choice in this section (you will need to do 5 out of 7 options, for example). Each is worth 3 marks. A diagram/lab-based question might have a copy of a topographic map (like the Columbia Ice field maps) and ask you some questions based on it … for instance …- what is located at 867534? You’ll say, “a glacier” or “a cirque” or whatever it is!
How to Study …
- Look over Labs 4-6. Make sure you can do any of the exercises. Most of you are doing really well on the labs anyway! Review Lab 6 as well. In particular, make sure you know how to use the soil texture triangle (know the order in which the and-silt-clay numbers are written, and how to find your soil on the triangle — see the extra note at the bottom of this page!
- The College provides study resources. Check them out.
- Read over the online notes. The exam is based on them.
- Make your own notes based on what you read.
- Quiz yourself.
- Use the questions at the end of each chapter in the text as a guide to study
- Make up your own questions to test yourself
- Use flashcards for key terms and concepts
- As you read the notes, do use the figures in the text (an online resources) as references. The figures/pictures really help you visualize what you’re studying.
- Review the chapters in the text. Note that I will NOT ask you anything that is only in the text, but not in your notes
- Check out the resources at www.masteringgeography.com. There are review questions and practice quizzes on the site (if you don’t have access it’s not essential, but it may be useful).
- coastal landforms (tombolos etc)
- glacial landforms (various moraines, cirques, etc)
- soils – the sand/silt/clay triangle (know how to use it – I’ll give it to you though)
- coral reefs
- periglacial (arctic) landforms (pingos etc)
- tides – what causes them/high and low tide
- soil orders – know basic info about them
- groundwater (aartesian wells etc)
- wave motion and beach sorting
- eolian erosion – how wind sculpts landscape
- desert landscapes – how sand dunes form
- soil profiles – how they work
What Should You Bring or NOT Bring?
You should bring …- Yourself! (refreshed, relaxed, invigorated, empowered by the Spirit)
- A pen (and pencil if you wish, for the diagrams).
- Your text or notes (sorry, this exam is not open book!)
- Your cousin (a geography graduate student at Cambridge University)
- Any crib notes, cheat sheets, or other “aids”
- Any electronic device (calculations will be simple enough you can do them on paper) — no calculators, phones, pagers, mp3 players, iPods, iPads, iAnything-elses, Blackberries, laptops, desktops, GPS, etc.
Extra note on the soil texture triangle from Chapter 18 / Lab 6
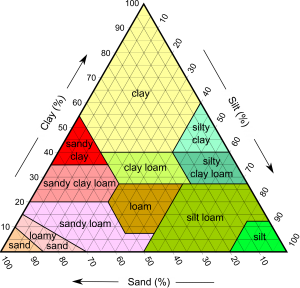
What you need to remember is the numbers are always in the order: sand, silt, clay (drill it in to tour memory: sand, silt, clay … sand, silt, clay… sand, silt, clay ..) So if your sample is 20/70/10
So, start with sand. In this example, the % sand is 20. So, go along the bottom from right to left to 20. Your sample will be along that 20 “line” somewhere.
Next go to silt — 70%. Silt is along the right hand side. Go down from the top to 70. When you find 70 on the silt axis (edge), your sample will be along that line.
Last, go to clay — 10%. Clay is along the left side. Go to 10. Clay is the easiest because the white lines go horizontally, so you go across on the 10 line.
And you’re there! A beautiful SILT LOAM!
It is a bit confusing! The key is to remember it’s always SAND-SILT-CLAY! And to make sure you are using the correct side. I will give you the identical diagram as above in the exam (I’ll just cut and paste it).
Hope that helps. B
So if your sample is 20/70/10
So, start with sand. In this example, the % sand is 20. So, go along the bottom from right to left to 20. Your sample will be along that 20 “line” somewhere.
Next go to silt — 70%. Silt is along the right hand side. Go down from the top to 70. When you find 70 on the silt axis (edge), your sample will be along that line.
Last, go to clay — 10%. Clay is along the left side. Go to 10. Clay is the easiest because the white lines go horizontally, so you go across on the 10 line.
And you’re there! A beautiful SILT LOAM!
It is a bit confusing! The key is to remember it’s always SAND-SILT-CLAY! And to make sure you are using the correct side. I will give you the identical diagram as above in the exam (I’ll just cut and paste it).
Hope that helps. B